Image To Product
Overview of the Image to Product Tool
The Image to Product tool by Naper.ai is revolutionizing product catalog management by utilizing advanced artificial intelligence to simplify the process of product registration. With minimal input required, such as an image, a brief description, or even an GTIN/EAN code, this tool can generate comprehensive product entries with remarkable accuracy and efficiency.
In this tutorial, we will explore the key features of the tool and demonstrate how to use it effectively to optimize your cataloging process.
Table of Contents
- Introduction
- Overview of Features
- How to Use the Image to Product Tool
- Applying Templates in Image to Product
- Output Details
- Conclusion
Introduction
Managing a product catalog can be a daunting task, especially when handling hundreds or thousands of items. The Image to Product tool addresses this challenge by leveraging AI to automate and enhance the product registration process.
Whether you have a product image, a description, an GTIN/EAN, or even a combination of all these inputs, the tool generates complete product information, including SEO data, attributes, descriptions and more. This tutorial provides a detailed walkthrough of its capabilities and steps for efficient usage.
Overview of Features
The Image to Product tool offers the following key functionalities:
- Registration from Images
Upload up to 6 images of a product, and the tool will extract essential details to create a complete product entry. - Registration from Text or Audio
Enter a brief product description or record an audio file, and let the tool process it into structured product information. - Registration from GTIN, UPC, EAN, or ISBN
Use an code to fetch product details from a connected database. - Comprehensive Input Support
Combine all available inputs—images, text, and EAN—for more accurate and enriched product registration. - Mass Registration
Upload a CSV file with product data to generate multiple product entries in one go. - Template Integration
Apply pre-configured templates to standardize fields such as descriptions, attributes, product names, and more.
How to Use the Image to Product Tool
Single Product Registration
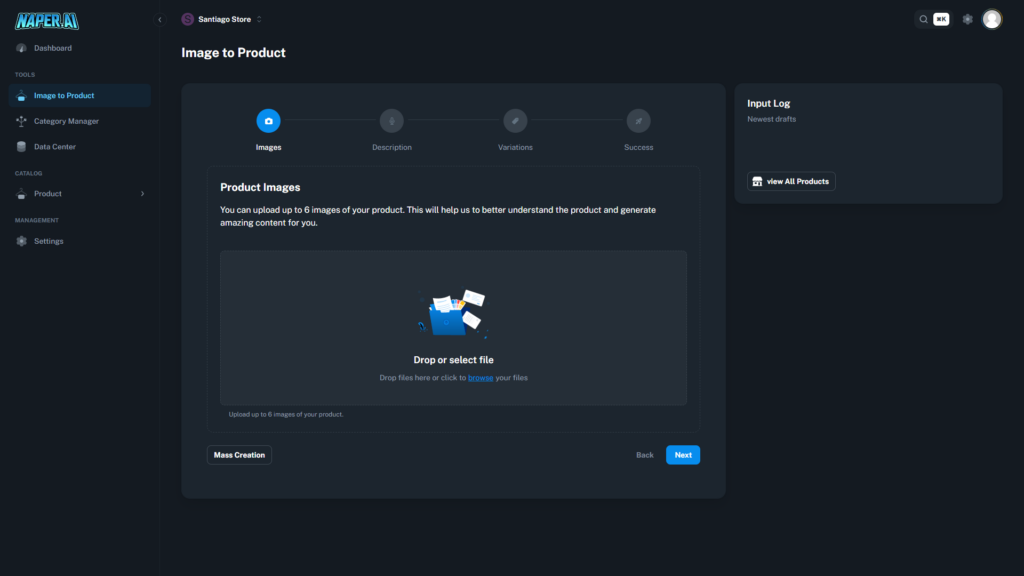
Step 1: Navigate to the “Image to Product” Section
From the Dashboard, select Image to Product under the “Tools” section. You will see the interface with multiple tabs guiding the product creation process.
Step 2: Upload Product Images
- Drag and drop up to 6 product images in the designated area.
- These images will be analyzed to generate product information such as attributes, alt text, and categorization.
- Click Next to proceed.
Step 3: Provide Additional Inputs
- Enter a product description manually or upload an audio description.
- Add the product’s EAN, GTIN, or ISBN codes for database lookups.
- Select a pre-configured template to standardize the product structure.
- Click Next to move to the Variations tab.
Step 4: Add Product Variations
- If your product has variations (e.g., color, size, voltage), add them in the Variations tab:
- Select an attribute type (e.g., Color, Size).
- Add options for each attribute (e.g., Color: Blue, Red).
- Repeat for all attributes.
- Click Generate Product to create the product.
Step 5: Check Product Creation Status
- Once the product is generated, its status will be displayed in the Input Log:
- Collecting Data > Enriching Inputs > Creating SEO Data > Done
- When the status changes to Done, the product is ready. Two buttons will appear:
- View Product: View the generated product page.
- Edit Product: Make additional changes to the product details.
Mass Product Registration
The Mass Creation feature is designed for users who need to register multiple products simultaneously. Here’s how it works:
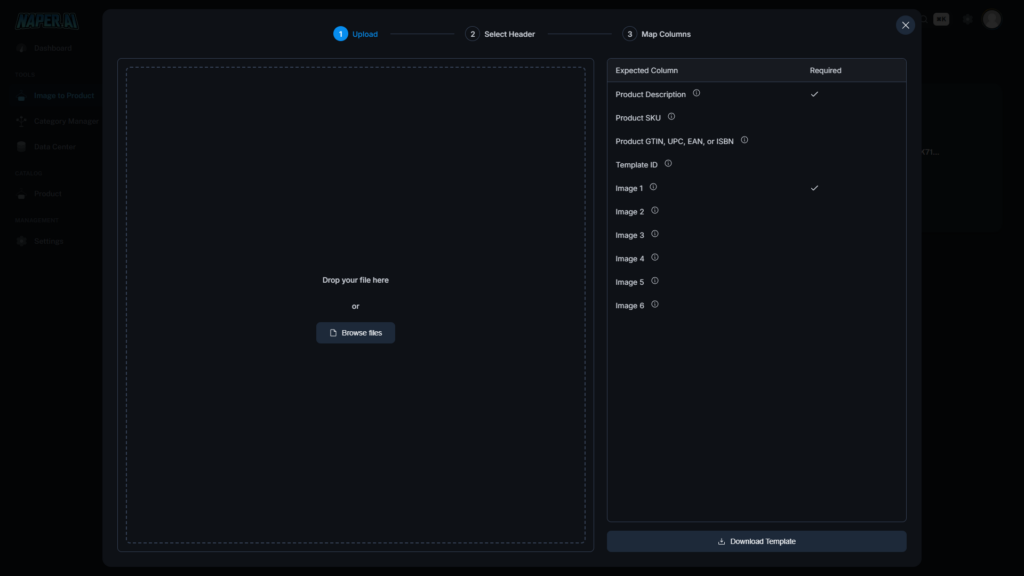
Step 1: Navigate to the Mass Creation Option
- Click Mass Creation button from the Image to Product Painel.
- You will see the CSV upload screen where you can download a sample CSV template by clicking Download Template.
Step 2: Upload the CSV File
- Drag and drop your CSV file or browse to select it.
- Ensure your CSV file follows the format outlined in the template.
Step 3: Preview and Map the Header Row
- A preview of the uploaded file will be displayed.
- Select the row that contains the headers for your data to ensure proper mapping of fields.
Step 4: Map Columns to Product Fields
- Map each column in the CSV to the corresponding product fields (e.g., Product Description, SKU, Image URLs).
- Verify all required fields are properly assigned before submitting.
Step 5: Submit for Processing
- Click Submit to process the CSV and generate the product entries.
Applying Templates in Image to Product
Templates are pre-configured in another section of the Naper.ai platform and can be applied during product registration in the Image to Product tool. Here’s how to leverage them:
- Create Templates
Templates can be created in the dedicated “Templates” section of the platform. These templates define the structure of fields such as:
- Product Descriptions (short and long descriptions)
- Attributes (e.g., “Size, Material, Color.”)
- Product Name (e.g., “[brand] [model/Specificity] [category] [attribute]”)
- Meta Title (SEO title e.g., “[Meta Title] | [Ecommerce Name]”)
- Meta Description (SEO meta description e.g., “[SEO-optimized meta description]”
- BannersID (for product images – feature under development…)
- Apply Templates in Image to Product
During product registration (single or mass creation), select a template from the dropdown menu. The selected template will standardize the data structure for all the fields it covers.
For more details on creating and managing templates, refer to the Templates.
Output Details
The Image to Product tool generates the following outputs for each product:
- Alt Text: Automatically generated for uploaded images.
- Product Attributes: Key attributes such as size, material, and color.
- Categorization: Products are categorized based on linked or created categories within Naper.ai.
- Product Name: Generated based on input data.
- Short and Long Descriptions: Detailed product descriptions suitable for e-commerce platforms.
- SEO Data: Includes SEO Title, Meta Description, and Keywords for better visibility.
- Brand Name: Identified or linked from the input data.
- Reviews: When available, reviews are fetched for GTIN/EANs linked to the database.
Conclusion
The Image to Product tool is a comprehensive solution for automating product catalog management. By utilizing features like template integration and mass registration, users can save significant time and effort while maintaining consistency and accuracy.
Explore the tool today and transform the way you manage your e-commerce catalog.
Additional Resources
For more details, visit the Naper.ai. If you have any questions, feel free to reach out to our support team.